Post by Bunta on Feb 14, 2006 21:26:54 GMT -5
Good To Know
Let's get right down to the facts so we can move on to actually making and using custom skins.
- Each car in LFS is a 3D model with a texture "wrapped" around it. In the case of LFS that texture is a JPG file, this image format was developed for use on the Internet and is therefore very common. LFS skins are JPG files, nothing any more complicated than that.
- Every decent (and many poor) graphics and paint programs support the JPG format. This makes skinning very easy in LFS because anyone can have a go. JPG images are easy to create and edit, and they use compression to reduce file size, helping to improve performance by minimising the load on PC hardware resources.
- LFS contains default skins which can be "painted over" in your favourite paint or graphics program, and saved as skins in JPG format for use in LFS. That's as simple as skinning really can be. You can find the default skins in your LFS/data/skins folder. Look for the plain white skins with no design on them.
- LFS skins have a special naming prefix for each car, you will notice this prefix in the skin name, for example: FZR_DEFAULT.jpg. The FZR_ prefix must be used for FZR cars if you want the game and LFS World to handle the textures (skins) properly. Apart from this technical reason, it makes good sense to have everyone using the same naming convention for skins. All cars each have their own 3-letter prefix followed by an underscore, check your skins folder and you will see how it works.
Basic Method Of Making A Skin
Ok this is really basic, but if you are a total newbie this will get you started:
1. Launch your graphics or paint program (recommended: Paint Shop Pro, Photoshop. Not recommended: Windows Paint).
2. Go to file/ open, browse to your LFS/data/skins folder and choose a default skin (plain white) for the car you wish to paint. Click Ok.
3. Using the paint and effects tools provided with your software you can paint the skin and create a design for your car. You may also cut and paste other images on to your skin. Sponsor logos are popular additions, as are racing stripes and numbers, your country's flag and things like that. Don't stop until you are very satisfied with your work.
4. Go to file/ save as, and make sure that the file type selected is JPG. Name your skin using the three-letter prefix, include the underscore. Don't use a common name like XFG_HONDA, be more unique. Don't use special characters in your filenames, keep it simple.
Making sure that you are saving to your LFS/data/skins folder, click Ok to save your JPG file.
There. You just made your first skin. I hope you put more time and effort into the next one, below are some tools and information to help you do your best. Please check our other tutorial topics for more advanced techniques and considerations.
Skinner's Tools:
- Graphics or Paint Software
Popular choices are Paint Shop Pro or Adobe Photoshop. Many free programs exist online. Avoid Windows Paint, it is marvellously inadequate.
- LFS CMX Viewer
A program created by Scawen to help skinners check their work without the need to launch the game. Get it here.
- Master Skinnerz Pro Kits
These kits will help you to make better, more accurate skins and save you time. Also included are various optional components to enhance your skins. Check them out here.
- LFS Sponsor Decals
Add some official LFS sponsor livery to your cars for that authentic LFS look. Many of the official LFS logos can be found here in PSD format.
- Custom Light Sets, Interiors, Steering Wheels
Enhance your favourite car with a Master Skinnerz custom light set, interior or wheel. Various components can be found here.
Using Your Custom Skin In LFS
How to apply your skin and see it in-game:
- Launch LFS, choose your car type and enter the garage.
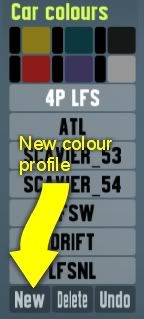
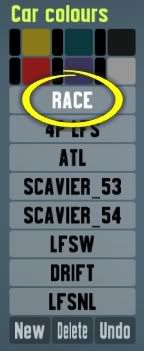
- Create a new colour profile or select your existing one if not already selected. Name your profile (I have called my profile "RACE" for this tutorial, you can name your own profile as you wish). After you have created a profile it will appear in the list as shown below.


- Click on the Colours button in the menu at the bottom of the garage screen.
- Using the colour sliders, set the body colour to white if using a custom skin, otherwise your skin will not look the way you meant it to. Body colours applied here will shine through your skin but only a white body will not effect your skin's colours.
- Choose your skin by clicking on the button next to the title Texture name, a list of all the skins for the car type selected will appear. These are the skins in your LFS/data/skins folder.

You can select a different skin for your profile whenever you like, just click on the Texture name button to bring up the list of available skins and choose one from there.
AI Skins
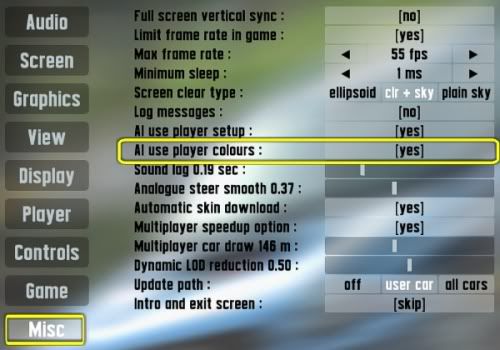
You can also make a colour profile for your AI drivers. Name the profile exactly the same as the AI driver's name and choose a skin. Whenever that AI driver uses that car type he will use the skin you selected for his profile. This is a great time-saver. Make sure that "AI use player colours" is selected in your Options/ Misc menu. With this selected, if you have not made a special AI colour profile, the AI will use whatever profile you are using.

Let's get right down to the facts so we can move on to actually making and using custom skins.
- Each car in LFS is a 3D model with a texture "wrapped" around it. In the case of LFS that texture is a JPG file, this image format was developed for use on the Internet and is therefore very common. LFS skins are JPG files, nothing any more complicated than that.
- Every decent (and many poor) graphics and paint programs support the JPG format. This makes skinning very easy in LFS because anyone can have a go. JPG images are easy to create and edit, and they use compression to reduce file size, helping to improve performance by minimising the load on PC hardware resources.
- LFS contains default skins which can be "painted over" in your favourite paint or graphics program, and saved as skins in JPG format for use in LFS. That's as simple as skinning really can be. You can find the default skins in your LFS/data/skins folder. Look for the plain white skins with no design on them.
- LFS skins have a special naming prefix for each car, you will notice this prefix in the skin name, for example: FZR_DEFAULT.jpg. The FZR_ prefix must be used for FZR cars if you want the game and LFS World to handle the textures (skins) properly. Apart from this technical reason, it makes good sense to have everyone using the same naming convention for skins. All cars each have their own 3-letter prefix followed by an underscore, check your skins folder and you will see how it works.
Basic Method Of Making A Skin
Ok this is really basic, but if you are a total newbie this will get you started:
1. Launch your graphics or paint program (recommended: Paint Shop Pro, Photoshop. Not recommended: Windows Paint).
2. Go to file/ open, browse to your LFS/data/skins folder and choose a default skin (plain white) for the car you wish to paint. Click Ok.
3. Using the paint and effects tools provided with your software you can paint the skin and create a design for your car. You may also cut and paste other images on to your skin. Sponsor logos are popular additions, as are racing stripes and numbers, your country's flag and things like that. Don't stop until you are very satisfied with your work.
4. Go to file/ save as, and make sure that the file type selected is JPG. Name your skin using the three-letter prefix, include the underscore. Don't use a common name like XFG_HONDA, be more unique. Don't use special characters in your filenames, keep it simple.
Making sure that you are saving to your LFS/data/skins folder, click Ok to save your JPG file.
There. You just made your first skin. I hope you put more time and effort into the next one, below are some tools and information to help you do your best. Please check our other tutorial topics for more advanced techniques and considerations.
Skinner's Tools:
- Graphics or Paint Software
Popular choices are Paint Shop Pro or Adobe Photoshop. Many free programs exist online. Avoid Windows Paint, it is marvellously inadequate.
- LFS CMX Viewer
A program created by Scawen to help skinners check their work without the need to launch the game. Get it here.
- Master Skinnerz Pro Kits
These kits will help you to make better, more accurate skins and save you time. Also included are various optional components to enhance your skins. Check them out here.
- LFS Sponsor Decals
Add some official LFS sponsor livery to your cars for that authentic LFS look. Many of the official LFS logos can be found here in PSD format.
- Custom Light Sets, Interiors, Steering Wheels
Enhance your favourite car with a Master Skinnerz custom light set, interior or wheel. Various components can be found here.
Using Your Custom Skin In LFS
How to apply your skin and see it in-game:
- Launch LFS, choose your car type and enter the garage.
- Create a new colour profile or select your existing one if not already selected. Name your profile (I have called my profile "RACE" for this tutorial, you can name your own profile as you wish). After you have created a profile it will appear in the list as shown below.


- Click on the Colours button in the menu at the bottom of the garage screen.
- Using the colour sliders, set the body colour to white if using a custom skin, otherwise your skin will not look the way you meant it to. Body colours applied here will shine through your skin but only a white body will not effect your skin's colours.
- Choose your skin by clicking on the button next to the title Texture name, a list of all the skins for the car type selected will appear. These are the skins in your LFS/data/skins folder.

You can select a different skin for your profile whenever you like, just click on the Texture name button to bring up the list of available skins and choose one from there.
AI Skins
You can also make a colour profile for your AI drivers. Name the profile exactly the same as the AI driver's name and choose a skin. Whenever that AI driver uses that car type he will use the skin you selected for his profile. This is a great time-saver. Make sure that "AI use player colours" is selected in your Options/ Misc menu. With this selected, if you have not made a special AI colour profile, the AI will use whatever profile you are using.


 tutorials. Especially because they ARE UNDERSTANDABLE - even for non native speakers and part time noobs like me...
  I once vowed to never write tutorials again, but if I think it can be done without focusing on one particular brand of software then I believe it has value to a lot of people. I don't want to try to sound like some expert either, I'm just passing on what I think is useful and relevant.


 But I found a link you were looking for, check your last post.