|
|
Post by drew555 on Dec 22, 2007 15:31:56 GMT -5
Hi people. I think I've mucked a setting up somewhere.... renders look fine, but when saved, the final saved render is a bit out of focus. At this size it looks fine.... 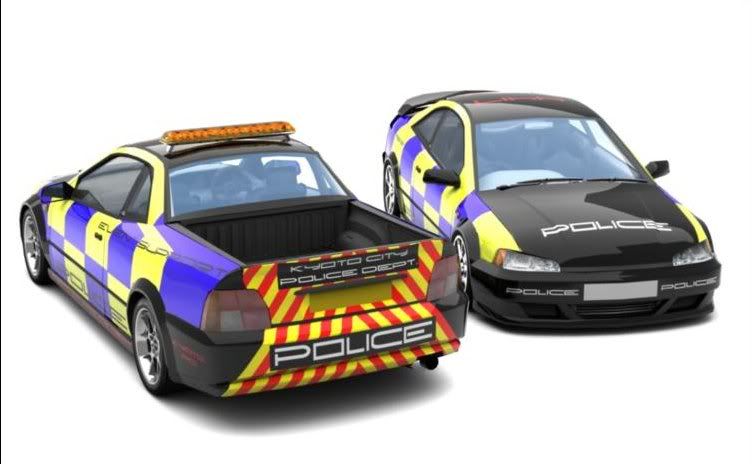 But the original looks like this.... i175.photobucket.com/albums/w144/driftwest/pickupandfxo.jpgAny ideas? Actually, here it looks a bit better... confused..... :edit: Thanks for the edit Bunta, I still dunno how to link instead of embed  |
|
|
|
Post by drgonzo on Dec 23, 2007 7:10:58 GMT -5
not an idea but I would open a new of Ian H.'s standard scenes delete everything and import this scene. So every preferences should be how they used to be.
|
|
|
|
Post by drew555 on Dec 23, 2007 10:49:31 GMT -5
Good plan, and a nice tip for in future, but I sussed it.
I had the JPG smoothing ramped right up :MORON:
|
|
|
|
Post by drew555 on Dec 24, 2007 15:50:49 GMT -5
|
|
|
|
Post by drgonzo on Dec 24, 2007 16:22:40 GMT -5
can you show us a picture?
|
|
|
|
Post by drew555 on Dec 24, 2007 20:12:43 GMT -5
|
|
|
|
Post by Bunta on Dec 25, 2007 2:39:03 GMT -5
I reckon I'm getting tired of removing the image tags from all of the gigantic images you post.
As for your render, it looks like you saved it at a low resolution then resized it in your graphics software. If you are using 3DSMax you should check two things: the export resolution, and the quality of the JPG. Both are adjustable.
|
|
|
|
Post by drew555 on Dec 25, 2007 11:56:24 GMT -5
Ah right, so I just remove the [ IMG] tags? I'll remember that..... And nope, no resizing... that's how it came out of 3DS, rendered at 1440 x 900 (not high enough?). :edit: If it helps, the ones that are coming out jaggy are also ones that seem to be rendering a lot faster than normal, and instead of rendering working from top left to bottom right, it's going centre out in spirals. This is what leads me to believe that it's a setting I've spooned, and not a JPG issue (that problem I sorted  ). :edit 2: Here's another example, in the interests of more examples of the jaggyness... i175.photobucket.com/albums/w144/driftwest/coptoy.jpgThis was rendered at 1440 x 900, I clicked the save button on the render window, and saved it at largest file size, highest quality and 50% JPG smoothing. No other editing/ resizing was done. |
|
|
|
Post by drgonzo on Dec 25, 2007 14:45:45 GMT -5
dont know Ian H's standard scenes are working fine for me. I normaly just hit the render button and save the jpg at highest quality.
btw: Can you tell me where you got the glass case from?
|
|
|
|
Post by drew555 on Dec 25, 2007 17:51:58 GMT -5
dont know Ian H's standard scenes are working fine for me. I normaly just hit the render button and save the jpg at highest quality. btw: Can you tell me where you got the glass case from? Oh God no, weren't a dig at the scenes, the scenes rock soooo hard! I just want to know what setting I've screwed with. Glass case: Made it (wip) Oh, and I'm having texturing issues and lighting issues and..... But they're for another thread when I get the hump with fiddling :edit: If you want the case scene, say so and I'll see about hosting something other than a pic.... |
|
|
|
Post by Bunta on Dec 25, 2007 20:28:39 GMT -5
Ah right, so I just remove the [ IMG] tags? I'll remember that..... And nope, no resizing... that's how it came out of 3DS, rendered at 1440 x 900 (not high enough?). :edit: If it helps, the ones that are coming out jaggy are also ones that seem to be rendering a lot faster than normal, and instead of rendering working from top left to bottom right, it's going centre out in spirals. This is what leads me to believe that it's a setting I've spooned, and not a JPG issue (that problem I sorted ). :edit 2: Here's another example, in the interests of more examples of the jaggyness... i175.photobucket.com/albums/w144/driftwest/coptoy.jpgThis was rendered at 1440 x 900, I clicked the save button on the render window, and saved it at largest file size, highest quality and 50% JPG smoothing. No other editing/ resizing was done. 1440 x 900? that seems like an odd proportion. 1440 x 1080 would be the normal ratio. But there is no need to go this high, Try 1280 x 960. Also what you said about the rendering pattern, it seems like you have chosen a different render method. Go to your render button and see which option you have selected. |
|
|
|
Post by drew555 on Dec 26, 2007 7:21:22 GMT -5
I reder at 1440 x 900 because that's the screen resolution I use, and most of the renders I do end up on my desktop. Forgive my terrible noobishness, but I presume when you say render button, you mean open this? 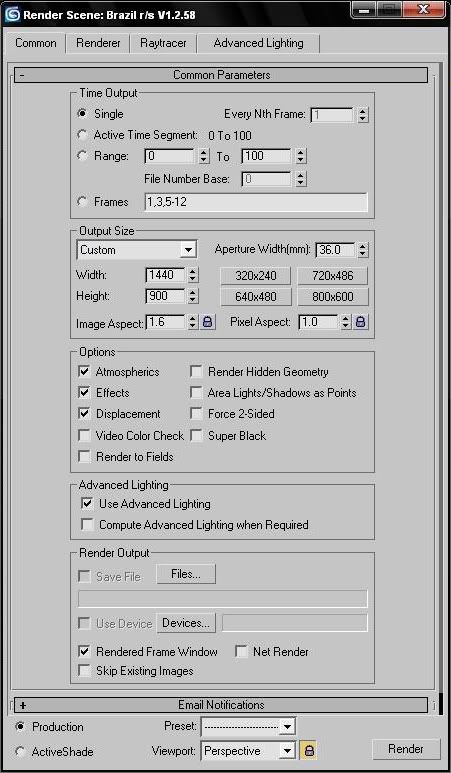 Whereabouts should I be looking for the render method? Once again, I cannot thank you enough for your patience and time, it really is appreciated - I'm really trying to get this nailed, but till it clicks in my head, I'll be in here regular doing all your heads in! :edit: This screengrab actually came from a scene that is rendering fine... because that's what I happened to have open. |
|
|
|
Post by drew555 on Dec 27, 2007 8:56:38 GMT -5
And another one.....
I have managed to get the roof lights blue, and now want to illuminate them...
I've followed a lightsaber tutorial, but I'm getting nowhere.
Anyone have a link to a good lighting up lights tutorial or have any great ideas?
|
|
|
|
Post by Ian.H on Jan 5, 2008 12:38:47 GMT -5
2 methods to do illumination like this, either simply apply a 'self-illuminating' material and add the lights texture to that, or, add an omni light inside the light area, then if required, add some planes (such as directly below the light) to prevent it from lighting up the inside of the car (omni lights are effectively 6 spotlights combined, so there's no general "pointing direction" as such). To use the omni light method, you'll also want to have a play about with the intensity and the falloffs (can't remember the damn name now, but in the lighting rollout, it begins with 'att' IIRC). This is used to define where the light starts and ends, so rather than lighting up a 20' radius area for example, you could limit it to just a few inches of lighting. Although I used Vray rather than brazil, here's a test I was playing about with previously (never finished however) doing something similar: Rendered scene: tk.digiserv.net/tmp/xrt_alley_wip_01.jpg3DS viewports: tk.digiserv.net/tmp/xrr_alley_3ds.jpgThe "rings" around the omnis for the rear indicators show the start / end of the lighting area. It'll take some trial and error, but I think can result in a nice and realistic effect  HTH. Regards, Ian |
|
|
|
Post by Bunta on Jan 5, 2008 19:13:35 GMT -5
"attenuation"
|
|


 ).
). 


 But I found a link you were looking for, check your last post.