


Post by Bunta on Feb 7, 2006 19:46:57 GMT -5
Carbon Fiber (CF) components have become very popular in motor racing engineering over the last twenty years or so. More recently we find CF parts available for road cars and see the use of CF in show cars more and more every day.
Before I get into the tricks of using CF in LFS skinning, I must point out a very important fact: Too much CF will ruin your skin (don't kid yourself, it's true), and if too many of your skins contain obvious CF they may lose their appeal as individual artworks/ liveries. So the first thing to learn about using CF textures in LFS skinning is to not overdo it. Additionally; CF textures increase file size. Lots of CF = huge file, be wary.
First let's examine the areas where Carbon Fibre textures would normally be found on a race car. We are only concerned with external parts here. CF is light and strong, great for weight reduction. In the first instance, its purpose is practical. Not cosmetic.
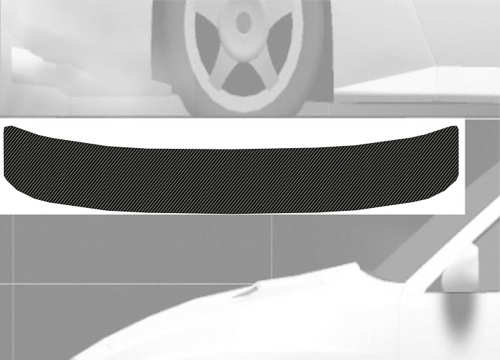
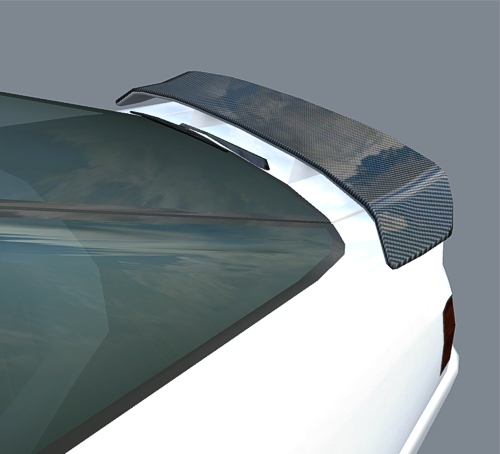
- Wings and spoilers may be made from CF, or even just parts of wings and spoilers. Struts that support the wing usually would not be made of CF.
- Vents and intakes. Keep it neat and trim. Make it look like the CF really belongs there. If unsure, don't use CF on your vents etc.
- Panels: doors and bonnets (hoods) may be CF. Any panel in reality may be CF but not often will you see large exanses of unpainted (let's call it "exposed") CF. The one acception is the bonnet (hood). It is not uncommon to see exposed CF on bonnets often with decals or artwork painted on top with the CF texture showing through. It can look awesome or shitty, depending on your approach to the design. Despite your initial glee at desinging your first CF bonnet, you need to be careful not to release the skin until you have had time to truly get used to your design. The point I want to make is that it is very easy to make a crappy CF bonnet. Remarkably easy.
- Mirrors and mirror stems: These are great to skin in a CF texture in LFS. Why? They don't stand out as gaudy CF overkill, they are subtle details that rarely look out of place if done correctly. CF is very cool if it is not immedialtely apparent. Small CF components are rarely an assault on the senses and won't dominate your skin. You can still do it all wrong of course, but small is often a good way to start.
Ok, now we know to be careful of large expanses of exposed CF texture. If you make an exposed CF bonnet, do an amazing job on some overlaying artwork. Take your time. The bonnet is prime skinning real estate and if it looks like someone just ate too many decals and threw up on your CF hood then you probably shouldn't use a CF texture there at all. Any artwork on any bonnet is taking up prime real estate, make the bonnet very plain or else make it very bloody good.
Do your best. Take a break and come back later for a fresh look. Improve your work further. Do your best again.
Textures
The "weave" of the CF texture plays an important role in how your CF will appear on your skin. Using a texture where the weave is too bold or thick won't look like real CF. In real life CF comes in varied constructions, different patterns or thickness of woven fibers create various textures. But a texture that looks too bold or large will just look like it is pasted-on, and not real. I recommend using as fine a texture as possible while still being able to see it as CF on track at a moderate distance. You don't want it so fine that it only looks like CF if you are an inch away from it. You don't want it so bold that it looks like vinyl wallpaper from the seventies.
Some examples of CF textures:
Several CF textures are popular with skinners, choose one that suits your needs. Some files are provided at the end of this tutorial to get you started but feel free to experiment until you get what you like.
The physical size in pixels of your texture may be important too. At least there is a practical size to consider before you start. You may be familiar with the skin stretching in LFS (actually all 3D games are effected by this though this is not the place to explain why) and our CF texture will be prone to that same stretching effect so we need to compensate before we use the texture. Assuming you make skins at 1024 x 1024 pixels; using the basic formula to combat stretching you would ideally have a CF texture that is 1280 x 1024 pixels in size. If you make skins at 2048 x 2048 the formula doubles to become 2560 x 2048. With your CF texture being pre-stretched you can apply your artwork and then squish it back to its proper size, therefore preventing stretching of your texture when used in-game. This may seem a trivial consideration but just try both ways and I believe you will agree that pre-stretching CF is the way to go.
The alignment or direction of the "weave" pattern in your texture also needs to be considered. It's ok to ignore this part if you wish but for a more perfect result you should consider it. Imagine you want to make two CF mirrors. You apply the texture to the mirror area of the skin and away you go right? If you view the car head-on you will notice that the direction of the weave on both mirrors is identical. It would be a more balanced approach to invert the texture (flip) on one side. The stripes of the weave on each mirror are now opposite, which looks much more symmetrical. Small detail makes a difference. For a spoiler you may want the same effect. By using two halves of CF texture and flipping one in the opposite direction than the first you can make a symmetrical CF pattern on the spoiler. This makes an even bigger impact than does the mirror symmetry. The technique doesn't work so great on rear wings (I prefer to skin the entire wing with CF pattern running just one direction) but on the front wings of the forumula cars it is the best way to do it and worth the extra effort.
To recap on textures:
- Choose an appropriate and realistic-looking CF texture for your skins.
- Use a large file that allows you to skin any part of the car in CF.
-Use a pre-stretched CF texture for best results.
- Consider making the pattern symmetrical in some places where it makes a noticable improvement to the balance of the skin.
Making CF Components For Your Skins
Lets move on to the actual work, cutting out a piece of CF for use on your skin. You may find the Master Skinnerz Pro Kits useful at this stage, but they are not mandatory.
Let's make a Carbon Fiber wing for the XRT.
If you want to make a CF wing you just need to cut out a piece of CF that is the right size to cover the wing area on your skin. Most good software will include a mask or marquee tool which you can use to outline the section you wish to cut away from the CF texture. This can be done "freehand", or you can use the wing layer from our skin kit to make a mask or marquee, this makes life easier.
Beginning with a large CF sheet (2560 X 2048), I first resize the sheet to 2048 x 2048, now my CF is not going to be stretched in-game and will retain the look I want with minimal distortion.
Next I drop the XRT wing layer on top of the CF sheet and use it to create a mask. A dotted line (marquee) appears.
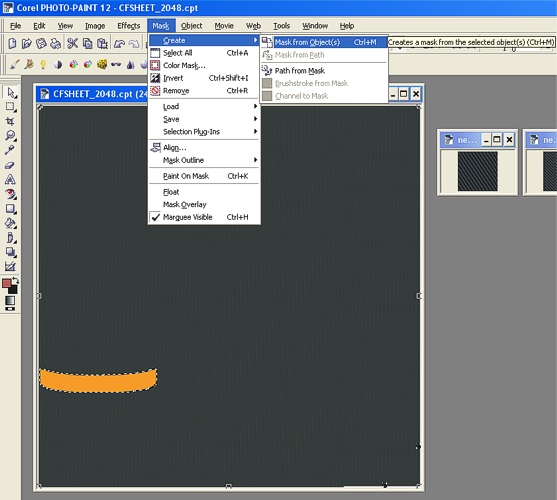
Now that I have my mask I can delete the wing layer if I wish, it isn't needed from here.
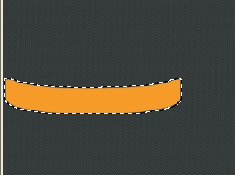
By right-clicking inside the masked area I can copy (ctrl+C also works in my software) and then paste as a new layer or directly onto my skin. That's all there is to applying a CF texture to the wing.
**I have used Corel Photopaint in these examples. Other software like Adobe Photoshop or Paint Shop Pro (now owned by Corel) may differ but both have a mask feature. In Photoshop I believe they call it a "marquee" instead of "mask" but the function is the same. The magic wand tool popular in many software titles is a type of masking tool as well.
Note that in my example I have only skinned the upper side of the wing, if making a skin I would texture both sides, but there is no strict rules, use your imagination.
Making A CF Bonnet (hood).
Making a CF bonnet is a little more challenging than a wing, because your masked bonnet must be very accurate. The wing has no adjacent skin area touching it so you are able to make the mask larger then the wing and it won't matter. But the bonnet is an island surrounded by areas that will show up on the skin, you need to be careful to "stay inside the lines" or else your CF texture will spill over on to the bodywork and will not look like a bonnet at all. In some of our skin kits an accurate bonnet has been included for your convenience. Cars that have the bonnet mapped in two sections are difficult to apply CF textures to. It is almost impossible to match up the CF weave of the two bonnet sections. Personally I avoid using CF on those cars, it is difficult to draw attention away from the seam between the two sections.
As with the XRT wing, you can use the bonnet layer from the skin kit to create your mask (some MSz kits already include a pre-made CF bonnet, others don't). If you want to make it from scratch then perhaps use the wireframe layer from the kit to maintain accuracy. Remember, the lower resolution you use for your skin, the less accurate your bonnet will be. I would not recommend going below 1024 x 1024 pixels (skin size) if you wish to add a bonnet to your skin.
As mentioned earlier, a plain CF bonnet can look rather drab. Apply some artwork and/or decals on top of the CF bonnet. Try to be creative and compliment the rest of the skin. It is easy to make a CF bonnet look totally out of place. Don't just throw decals all over it, use your creative skills to prevent your skin looking like just another five-minute job.
Downloads:
Super-sized CF texture (JPG) @ 2560 x 2048. This file has been archived with Winrar. 2.3MB unpacks to 6.1MB
**If you do not yet know about skin stretching please read the stretching tutorial located in this section.
Before I get into the tricks of using CF in LFS skinning, I must point out a very important fact: Too much CF will ruin your skin (don't kid yourself, it's true), and if too many of your skins contain obvious CF they may lose their appeal as individual artworks/ liveries. So the first thing to learn about using CF textures in LFS skinning is to not overdo it. Additionally; CF textures increase file size. Lots of CF = huge file, be wary.
First let's examine the areas where Carbon Fibre textures would normally be found on a race car. We are only concerned with external parts here. CF is light and strong, great for weight reduction. In the first instance, its purpose is practical. Not cosmetic.
- Wings and spoilers may be made from CF, or even just parts of wings and spoilers. Struts that support the wing usually would not be made of CF.
- Vents and intakes. Keep it neat and trim. Make it look like the CF really belongs there. If unsure, don't use CF on your vents etc.
- Panels: doors and bonnets (hoods) may be CF. Any panel in reality may be CF but not often will you see large exanses of unpainted (let's call it "exposed") CF. The one acception is the bonnet (hood). It is not uncommon to see exposed CF on bonnets often with decals or artwork painted on top with the CF texture showing through. It can look awesome or shitty, depending on your approach to the design. Despite your initial glee at desinging your first CF bonnet, you need to be careful not to release the skin until you have had time to truly get used to your design. The point I want to make is that it is very easy to make a crappy CF bonnet. Remarkably easy.
- Mirrors and mirror stems: These are great to skin in a CF texture in LFS. Why? They don't stand out as gaudy CF overkill, they are subtle details that rarely look out of place if done correctly. CF is very cool if it is not immedialtely apparent. Small CF components are rarely an assault on the senses and won't dominate your skin. You can still do it all wrong of course, but small is often a good way to start.
Ok, now we know to be careful of large expanses of exposed CF texture. If you make an exposed CF bonnet, do an amazing job on some overlaying artwork. Take your time. The bonnet is prime skinning real estate and if it looks like someone just ate too many decals and threw up on your CF hood then you probably shouldn't use a CF texture there at all. Any artwork on any bonnet is taking up prime real estate, make the bonnet very plain or else make it very bloody good.
Do your best. Take a break and come back later for a fresh look. Improve your work further. Do your best again.
Textures
The "weave" of the CF texture plays an important role in how your CF will appear on your skin. Using a texture where the weave is too bold or thick won't look like real CF. In real life CF comes in varied constructions, different patterns or thickness of woven fibers create various textures. But a texture that looks too bold or large will just look like it is pasted-on, and not real. I recommend using as fine a texture as possible while still being able to see it as CF on track at a moderate distance. You don't want it so fine that it only looks like CF if you are an inch away from it. You don't want it so bold that it looks like vinyl wallpaper from the seventies.
Some examples of CF textures:
 |  |  |  |
Several CF textures are popular with skinners, choose one that suits your needs. Some files are provided at the end of this tutorial to get you started but feel free to experiment until you get what you like.
The physical size in pixels of your texture may be important too. At least there is a practical size to consider before you start. You may be familiar with the skin stretching in LFS (actually all 3D games are effected by this though this is not the place to explain why) and our CF texture will be prone to that same stretching effect so we need to compensate before we use the texture. Assuming you make skins at 1024 x 1024 pixels; using the basic formula to combat stretching you would ideally have a CF texture that is 1280 x 1024 pixels in size. If you make skins at 2048 x 2048 the formula doubles to become 2560 x 2048. With your CF texture being pre-stretched you can apply your artwork and then squish it back to its proper size, therefore preventing stretching of your texture when used in-game. This may seem a trivial consideration but just try both ways and I believe you will agree that pre-stretching CF is the way to go.
The alignment or direction of the "weave" pattern in your texture also needs to be considered. It's ok to ignore this part if you wish but for a more perfect result you should consider it. Imagine you want to make two CF mirrors. You apply the texture to the mirror area of the skin and away you go right? If you view the car head-on you will notice that the direction of the weave on both mirrors is identical. It would be a more balanced approach to invert the texture (flip) on one side. The stripes of the weave on each mirror are now opposite, which looks much more symmetrical. Small detail makes a difference. For a spoiler you may want the same effect. By using two halves of CF texture and flipping one in the opposite direction than the first you can make a symmetrical CF pattern on the spoiler. This makes an even bigger impact than does the mirror symmetry. The technique doesn't work so great on rear wings (I prefer to skin the entire wing with CF pattern running just one direction) but on the front wings of the forumula cars it is the best way to do it and worth the extra effort.
To recap on textures:
- Choose an appropriate and realistic-looking CF texture for your skins.
- Use a large file that allows you to skin any part of the car in CF.
-Use a pre-stretched CF texture for best results.
- Consider making the pattern symmetrical in some places where it makes a noticable improvement to the balance of the skin.
Making CF Components For Your Skins
Lets move on to the actual work, cutting out a piece of CF for use on your skin. You may find the Master Skinnerz Pro Kits useful at this stage, but they are not mandatory.
Let's make a Carbon Fiber wing for the XRT.
If you want to make a CF wing you just need to cut out a piece of CF that is the right size to cover the wing area on your skin. Most good software will include a mask or marquee tool which you can use to outline the section you wish to cut away from the CF texture. This can be done "freehand", or you can use the wing layer from our skin kit to make a mask or marquee, this makes life easier.
Beginning with a large CF sheet (2560 X 2048), I first resize the sheet to 2048 x 2048, now my CF is not going to be stretched in-game and will retain the look I want with minimal distortion.
Next I drop the XRT wing layer on top of the CF sheet and use it to create a mask. A dotted line (marquee) appears.
Now that I have my mask I can delete the wing layer if I wish, it isn't needed from here.
By right-clicking inside the masked area I can copy (ctrl+C also works in my software) and then paste as a new layer or directly onto my skin. That's all there is to applying a CF texture to the wing.
 | The texture is placed on the skin. |
 | The resulting CF wing. |
**I have used Corel Photopaint in these examples. Other software like Adobe Photoshop or Paint Shop Pro (now owned by Corel) may differ but both have a mask feature. In Photoshop I believe they call it a "marquee" instead of "mask" but the function is the same. The magic wand tool popular in many software titles is a type of masking tool as well.
Note that in my example I have only skinned the upper side of the wing, if making a skin I would texture both sides, but there is no strict rules, use your imagination.
Making A CF Bonnet (hood).
Making a CF bonnet is a little more challenging than a wing, because your masked bonnet must be very accurate. The wing has no adjacent skin area touching it so you are able to make the mask larger then the wing and it won't matter. But the bonnet is an island surrounded by areas that will show up on the skin, you need to be careful to "stay inside the lines" or else your CF texture will spill over on to the bodywork and will not look like a bonnet at all. In some of our skin kits an accurate bonnet has been included for your convenience. Cars that have the bonnet mapped in two sections are difficult to apply CF textures to. It is almost impossible to match up the CF weave of the two bonnet sections. Personally I avoid using CF on those cars, it is difficult to draw attention away from the seam between the two sections.
As with the XRT wing, you can use the bonnet layer from the skin kit to create your mask (some MSz kits already include a pre-made CF bonnet, others don't). If you want to make it from scratch then perhaps use the wireframe layer from the kit to maintain accuracy. Remember, the lower resolution you use for your skin, the less accurate your bonnet will be. I would not recommend going below 1024 x 1024 pixels (skin size) if you wish to add a bonnet to your skin.
As mentioned earlier, a plain CF bonnet can look rather drab. Apply some artwork and/or decals on top of the CF bonnet. Try to be creative and compliment the rest of the skin. It is easy to make a CF bonnet look totally out of place. Don't just throw decals all over it, use your creative skills to prevent your skin looking like just another five-minute job.
Downloads:
Super-sized CF texture (JPG) @ 2560 x 2048. This file has been archived with Winrar. 2.3MB unpacks to 6.1MB
**If you do not yet know about skin stretching please read the stretching tutorial located in this section.


 But I found a link you were looking for, check your last post.
