|
|
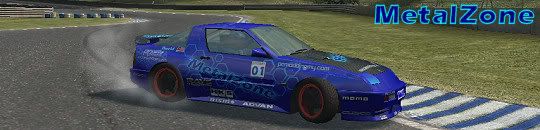
Post by MetalZone on Oct 31, 2005 6:02:50 GMT -5
hmm... no one answered by question?
|
|
|
|
Post by Al Heeley on Oct 31, 2005 6:11:18 GMT -5
Erm, which question?
Your question about headlights being a little too dark?
Your question about texturing FZR rear lights?
Your question about making the ground plane reflect the car?
I can only answer the last, that's by setting the material to something reflective in the render csv server.
|
|
|
|
Post by Hippy Druid on Nov 2, 2005 10:13:02 GMT -5
Howdy,
Now I am new to this whole rendering thing, so forgive my lack of articulation when it comes to 3ds Max 7 and the Brazil Renderer skills.
This question is in regards to Grudd's PDF tutorial.
Ok, I have successfully added my car skin to the mesh in 3ds, so when I render it will show up nicely, however in chapter 5- Textures/material's adjustment of Grudd's tutorial I am a little confused as how I add the glass and the metal textures to the rims.
I have created myself the glass textures and the metal texture in an empty slot, now do I just drag these textures over to the corresponding ID numbers of the mtl_XFG - XF GTI that I dragged into the 1st Empty slot?
Is this the procedure I need to follow for all the ID's?
e.g. When I render I see the inside of my car has the same texture as the outside, where it should be the interior texture, should the interior texture appear automatically? or do I continue to create a bitmap in a empty slot, assign the interior texture to the bitmap and then drag and drop on to the corresponding ID number?
I have been doing this! and it seems to work ok, but slightly time consuming. Basically what I want to know is have I setup Brazil or something incorrectly should the interiors, rear lights, headlights, automatically appear? Or do I keep creating them from the .dds files etc then drag and drop them?
I hope this makes some kind of sense, again forgive me for my explanation, but I am a little confused.
I would prefer to learn all of this, than just download the files and just add a skin, hit render and get the finished product. I am really keen to create some quality renders, but am I heading in the right direction?
|
|
|
|
Post by MetalZone on Nov 8, 2005 14:14:21 GMT -5
Erm, which question? Your question about headlights being a little too dark? Your question about texturing FZR rear lights? Your question about making the ground plane reflect the car? I can only answer the last, that's by setting the material to something reflective in the render csv server. about making the headlights glass clear like the way most of u do it. i'm limited to mentalray and the default materials only. i figured out how to reflect the ground already anyway.  by making a box instead of a plane and assigned a reflective material to it. |
|
zed28
Advanced Skinner

Posts: 167
|
Post by zed28 on Nov 17, 2005 18:08:01 GMT -5
Howdy, Now I am new to this whole rendering thing, so forgive my lack of articulation when it comes to 3ds Max 7 and the Brazil Renderer skills. This question is in regards to Grudd's PDF tutorial. Ok, I have successfully added my car skin to the mesh in 3ds, so when I render it will show up nicely, however in chapter 5- Textures/material's adjustment of Grudd's tutorial I am a little confused as how I add the glass and the metal textures to the rims. I have created myself the glass textures and the metal texture in an empty slot, now do I just drag these textures over to the corresponding ID numbers of the mtl_XFG - XF GTI that I dragged into the 1st Empty slot? Is this the procedure I need to follow for all the ID's? e.g. When I render I see the inside of my car has the same texture as the outside, where it should be the interior texture, should the interior texture appear automatically? or do I continue to create a bitmap in a empty slot, assign the interior texture to the bitmap and then drag and drop on to the corresponding ID number? I have been doing this! and it seems to work ok, but slightly time consuming. Basically what I want to know is have I setup Brazil or something incorrectly should the interiors, rear lights, headlights, automatically appear? Or do I keep creating them from the .dds files etc then drag and drop them? I hope this makes some kind of sense, again forgive me for my explanation, but I am a little confused. I would prefer to learn all of this, than just download the files and just add a skin, hit render and get the finished product. I am really keen to create some quality renders, but am I heading in the right direction? In Grudds tutorial where he has you create new materials for the rims and glass, yes, if you have created them in new slots, you have to drag them into the relevent slot in the main multi-material list. The other thing is, you don't have to create new materials outside the Multi Material group, you can edit the ones in there instead. I like to keep all of my car textures in one slot and have external textures for other parts of the scene in other slots. Each part of the car has a specific ID assigned to it for the material to be applied to it. Going through that tutorial and loading up the material list, I found I had to fix every one of them. It's also a good idea to label what the slots are for - like slot 4 would say "Wheels" while the skin slot could say "Skin" etc. The drab gray material that you see on the inside is because you haven't applied the corresponding texture to the slot for that material ID yet. It does get pretty easy after a while; I've done almost all of the cars and you can do one in about 30 mins once you've gone through it a few times. I was thinking of putting a few screen shots together of the parts that are actually affected by a particular texture but this would be model specific. Shout up if I've been unclear about anything or if you need any additional help. Grudd's tutorial is certainly the thing to get you going but there are parts of it that leave you scratching your head at times, especially if you are just touching 3DS for the first time! LOL |
|
zed28
Advanced Skinner
Posts: 167
|
Post by zed28 on Nov 17, 2005 18:15:45 GMT -5
Erm, which question? Your question about headlights being a little too dark? Your question about texturing FZR rear lights? Your question about making the ground plane reflect the car? I can only answer the last, that's by setting the material to something reflective in the render csv server. about making the headlights glass clear like the way most of u do it. i'm limited to mentalray and the default materials only. i figured out how to reflect the ground already anyway. by making a box instead of a plane and assigned a reflective material to it. MZ, I really dig your renders and I too have a vested interest in making the default scanline or mentalray renderers work as I have the free version of Brazil. You seem to have done pretty well with figuring out the lighting - the part that I have the most trouble with!  How are you lighting your scenes, what lights are you using, how many, how close etc. I see you've used an HDRI image for reflection. I have done this also but when I turn on reflection for the floor, I get the HDRI effect on it too which I want to turn off (for the floor only). |
|
|
|
Post by Bunta on Nov 17, 2005 18:30:21 GMT -5
|
|
zed28
Advanced Skinner
Posts: 167
|
Post by zed28 on Nov 18, 2005 4:56:42 GMT -5
|
|
|
|
Post by Bunta on Nov 18, 2005 5:35:46 GMT -5
|
|
|
|
Post by Hippy Druid on Nov 20, 2005 21:05:04 GMT -5
Thanks for the reply mate, I sussed out what I was doing wrong, and pretty much everything you explained makes more sense to me now I need to spend some time doing some of the basic 3ds tutes so I can get the fundamentals of the software down pat. Thanks again! Hippy |
|
|
|
Post by B11TME on Nov 22, 2005 19:29:59 GMT -5
I got this little problem with adding another skins to another car...I done this once and i did not know how i done it. I have tried to drag the skin over to the car but the windows come out rendered lol. So when i have 2 cars i can only skin the first car that i opened. I am new to 3ds max so could some one help me with how to put skins on more than 1 car? Many thanks
|
|
|
|
Post by smurfen on Nov 24, 2005 6:44:52 GMT -5
can enyone tell what vertices is? this line is in the tutorial -With this tool, select only the rim’s  vertices . (not to good at english |
|
|
|
Post by Al Heeley on Nov 24, 2005 13:22:52 GMT -5
"...the point where two lines meet to form an angle, or the point that is opposite the base of a shape."
|
|
|
|
Post by smurfen on Nov 24, 2005 16:00:54 GMT -5
"...the point where two lines meet to form an angle, or the point that is opposite the base of a shape." thank you al heeley... you seems to know evrything..  |
|
|
|
Post by Bunta on Nov 24, 2005 17:59:26 GMT -5
Vertices: each vertex shows up in max as little dots where polygons meet.
Edges: those lines that join the vertices
Polygons: 2 triangular facets or "faces"
Face: a triangle, 2 of them make a poly.
You can click on a poly, or a group of them, then apply a colour or map to that area. Hold the CTRL key and select with the left mouse button to select multiple polys. When modelling you can apply many modifiers to a selected poly, vertex, line etc, or a group of them. Some modifiers are not available for some elements.
You can use the spacebar to temporarily lock the selected parts while you rotate the model etc. This prevents accidental deselection.
|
|


 by making a box instead of a plane and assigned a reflective material to it.
 How are you lighting your scenes, what lights are you using, how many, how close etc. I see you've used an HDRI image for reflection. I have done this also but when I turn on reflection for the floor, I get the HDRI effect on it too which I want to turn off (for the floor only).
 vertices

 But I found a link you were looking for, check your last post.
